This post may contain affiliate links. Please read my disclosure policy.


About This Recipe
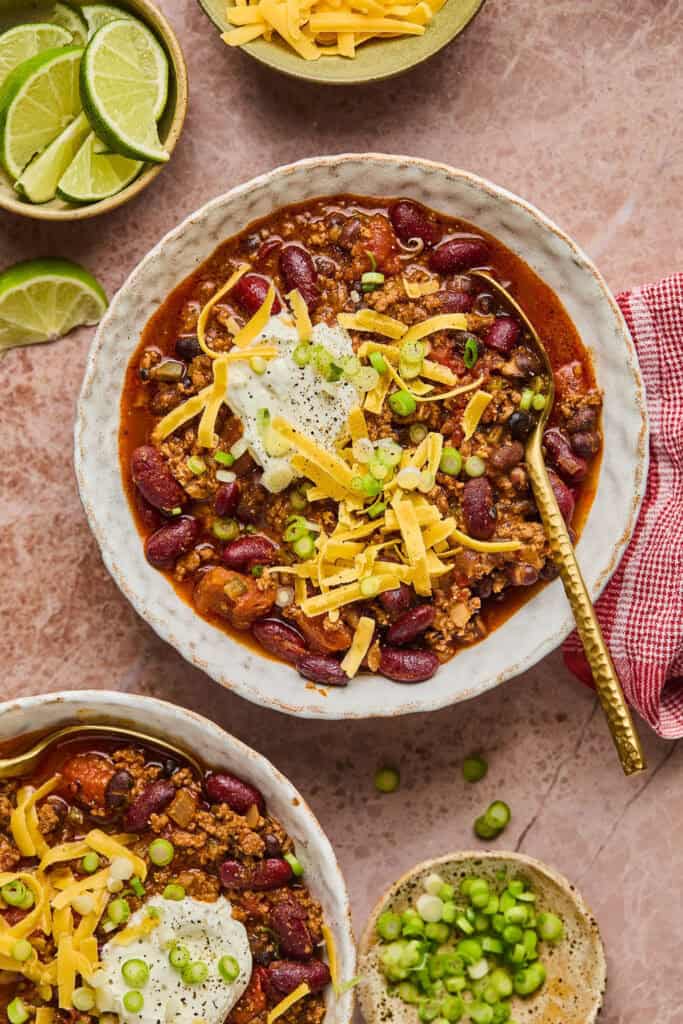
This healthy classic beef and bean chili is a hearty, comforting dish that’s packed with protein, fiber, and bold flavors! It’s perfect for a cozy dinner or meal prep. This chili combines lean ground beef, several types of beans, and a simple blend of spices and a few flavor-enhancing veggies.
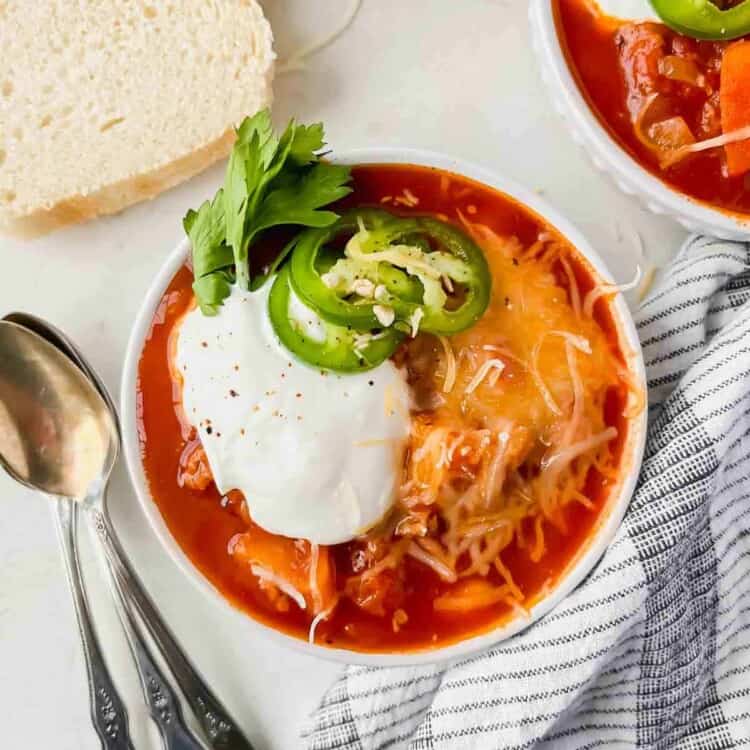
This chili is super easy to make in one pot in only 35 minutes! Serve this basic chili with your favorite toppings, like avocado, fresh cilantro, or a dollop of sour cream (or Greek yogurt). And don’t forget the homemade biscuit or crostini for dipping!
If you’re looking for more delicious chili recipes, try my crockpot white chicken chili, butternut squash turkey chili or my healthy harvest chili!
Why You’ll Love This Classic Chili Recipe
- High protein! This easy chili recipe is packed with protein thanks to the lean ground beef and beans!
- Full of fiber! Over 13 grams of dietary fiber per bowl!
- Gluten-free and dairy-free! Can also be made vegetarian using meatless crumbles!
- Super filling! This hearty chili is super filling and satisfying thanks to high protein and fiber content!
- Family favorite! Everyone will love this super easy traditional chili recipe! Great for an easy weeknight meal, meal prep or game day!
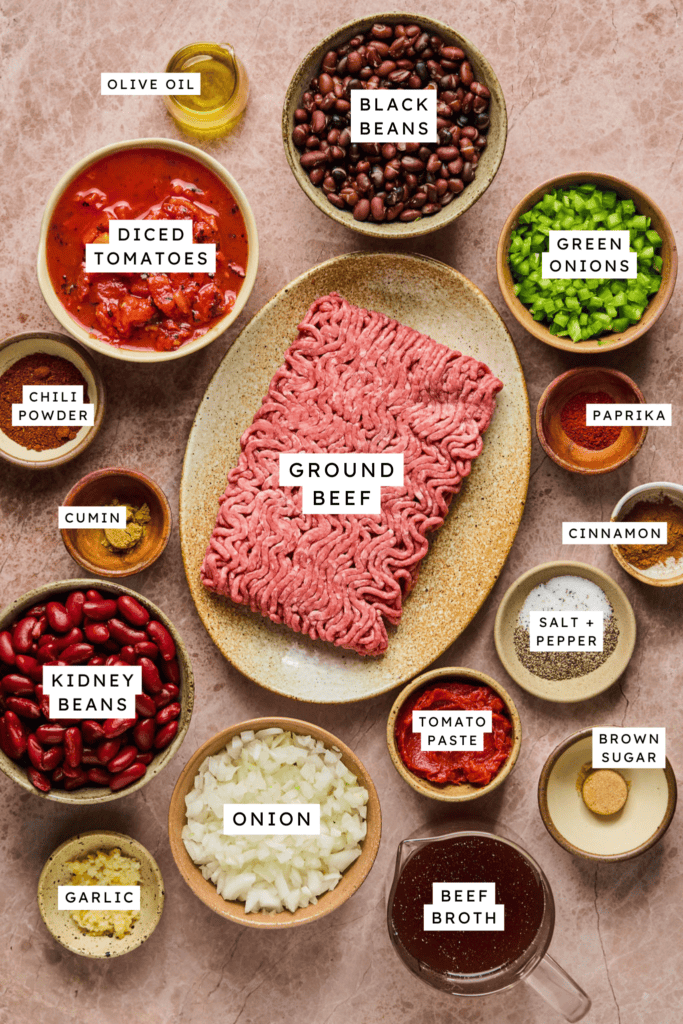
- Olive oil: The olive oil helps everything cook the vegetables and beef since we’re using a leaner ground beef. Any cooking oil you prefer works.
- Onion and bell pepper: Use any blend of veggies you love! I used a yellow onion but you could use white or red. You can also use any color bell pepper you prefer, I used green.
- Ground beef: I used lean 92/8 ground beef. You could also use ground turkey or ground chicken.
- Garlic: Fresh minced or frozen garlic cubes (I love the frozen cubes for dishes like this chili)!
- Tomato paste: The tomato paste really helps to deepen the flavor of this beef chili.
- Spices: Grab some chili powder, black pepper, paprika, cumin, and cinnamon (the secret ingredient that really elevates the flavor!).
- Beef broth: I prefer using beef broth since this is a beef-based chili but you could use chicken or vegetable if needed. You could also use bone broth for additional protein.
- Fire-roasted tomatoes: I love the extra flavor the fire-roasted tomatoes give this chili recipe but regular diced tomatoes would also work.
- Beans: I used red kidney beans and black beans but you can use any type of beans you like!
- Brown sugar: Adds the perfect amount of sweetness to this chili recipe.
- Optional for topping: shredded cheddar cheese, sour cream green onions, etc.
- Spice: If you like additional spice add some diced jalapeno or throw in some cayenne pepper or red pepper flakes!
- Corn: If you like sweet and savory, throw some sweet corn in there for added flavor and crunch!
- Veggies: Need to clean out your fridge? Throw any of your favorite veggies in there like butternut squash, sweet potato, celery, etc.
- Different types of beans: Try pinto beans, white cannellini beans, garbanzo beans, etc.
How To Make
The full printable recipe is below, but let me walk you through the process so you know what to expect when you’re making it!

1. Heat the olive oil in a dutch oven or large heavy pot over medium heat. Once hot, add the onions and bell pepper. Cook until tender and browned on the edges, about 7-9 minutes, stirring occasionally.
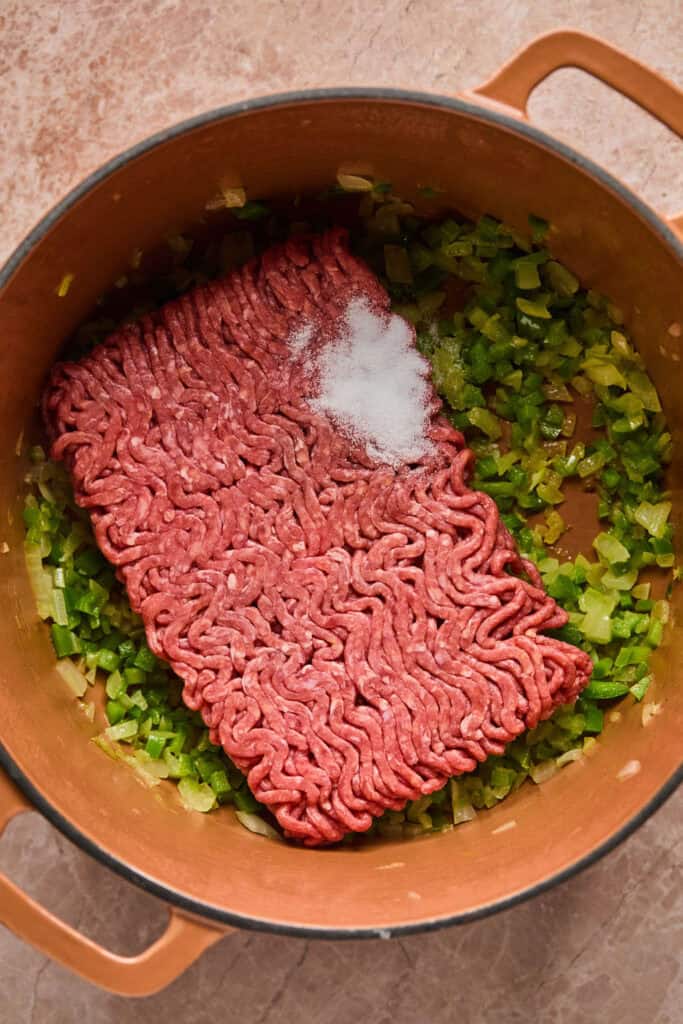
2. Add the ground beef and salt. Cook, until no longer pink, about another 6 minutes, breaking into small crumbles with a meat masher as you go.
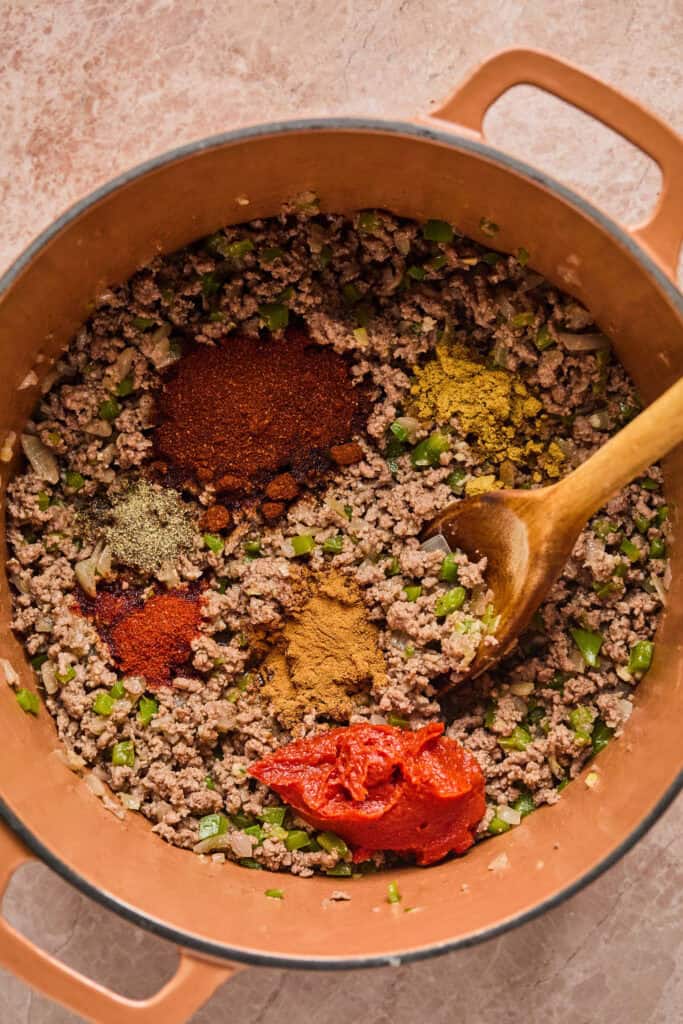
3. Add the garlic. Stir for about 30 seconds, until fragrant. Add the tomato paste, chili powder, black pepper, paprika, cumin and cinnamon. Combine well and cook for another 2 minutes.
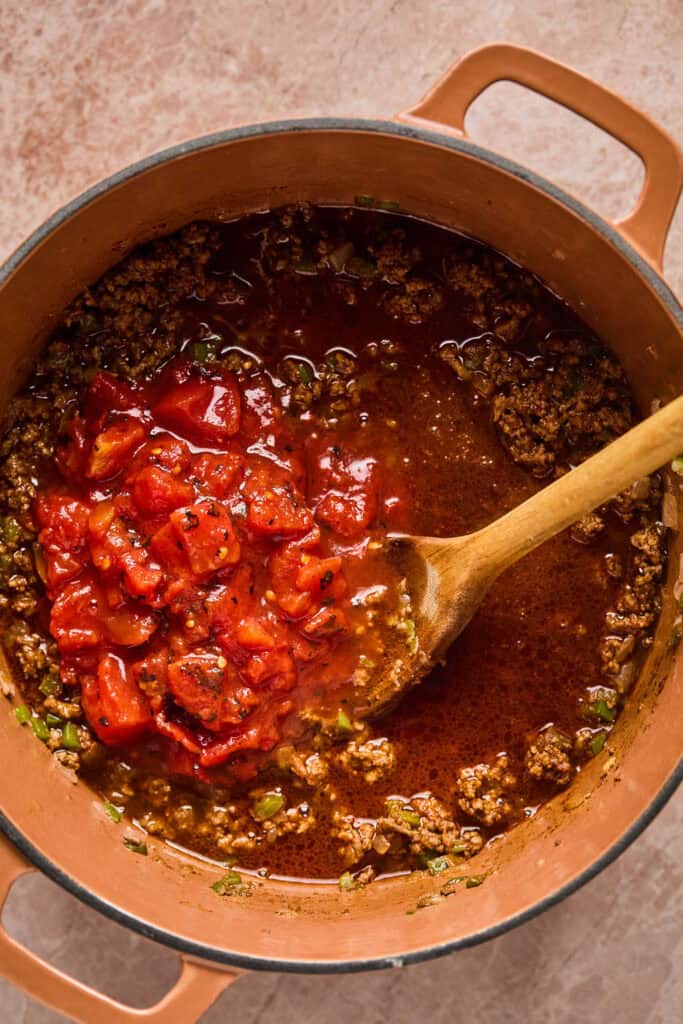
4. Add the broth and fire roasted tomatoes. Bring to a boil, then reduce heat to low, cover and simmer for 10 minutes (or longer if you want).

5. Stir in the kidney beans, black beans and brown sugar.

6. Taste and adjust seasonings as needed. Serve with your favorite chili toppings and enjoy!
- Storage: Store leftover chili in an airtight container in the fridge for up to a week.
- Freeze: Let chili cool completely then add to an airtight container or freezer-safe Ziploc bag and freeze for about 3-4 months. If freezing in a Ziploc bag, I recommend laying the freezer bags flat. Then, move it upright the next day once frozen to save space. When ready to enjoy, thaw in the refrigerator overnight and reheat the next day.
- Reheat: Add your desired portion to a saucepan over medium-heat and warm. You can also microwave portions in a covered microwave-safe container.
Helpful Tips
- Longer simmer: If you have time, let your chili simmer as long as possible before adding the beans and brown sugar. This helps the depth of flavor and makes it extra tasty!
- Don’t overcook beans: Make sure to add your beans last and cook just until they’re warm through so they don’t end up mushy!
- Great to freeze: This chili freezes great for feel free to make a double batch and save half for later!

What To Serve With Chili
This chili is amazing straight up! I will say though there have been some yummy toppings and additions that have really leveled this meal up for me and brought the flavors out even more. Here are some different ways to eat it:
- Sour cream (or plain Greek yogurt) on top – adds a level of creaminess.
- Avocado on top – adds a different sort of creaminess, plus healthy fats.
- Cheese on top – freshly shredded cheddar cheese tastes absolutely heavenly!
- Green onion – sprinkle a little bit on top to bring some freshness and a crunch!
- Grilled cheese sandwich – enough said!
- Bread – Toast, roll, biscuit, cornbread, crostini, you name it – bread is always a good idea.
- Chips– tortilla chips or corn chips perfect for dipping!
Yes! Saute your ground beef and veggies then add to the crock pot. Add the rest of the ingredients, cover, and place on high for 3 to 4 hours or low for 6 to 8 hours.
Yes, I like to drain and rinse the canned beans when making chili to remove any excess sodium and liquid. If you choose to omit this step, you may just want to reduce the amount of beef broth a bit so you still get a nice, thick chili.


Did you make this? If you snap a photo, please be sure leave a review, tag me on Instagram or TikTok at @LaurenFitFoodie or hashtag #LaurenFitFoodie so I can see your creations!

Classic Beef and Bean Chili
Ingredients
- 1 Tbsp olive oil (15g)
- 1 large yellow onion (220g) finely diced
- 1 green bell pepper (150g) finely diced
- 1 lb. ground beef 92%
- 1/2 tsp salt
- 2 cloves garlic minced
- 2 Tbsp tomato paste (33g)
- 1 heaping Tbsp chili powder
- 1/2 tsp each black pepper, paprika, cumin, cinnamon
- 1 cup beef broth (240g)
- 1 14.5-oz. can fire roasted tomatoes with juices
- 1 15-oz. can red kidney beans rinsed & drained
- 1 15-oz. can black beans rinsed & drained
- 1 tsp brown sugar (4g) 4g
Optional for topping:
- Shredded cheddar cheese
- Sour cream
- Green onions thinly sliced
Before You Begin! If you make this, please leave a review and rating letting us know how you liked this recipe! This helps our business thrive & continue providing free recipes. Scroll for macros and MyFitnessPal code.
Instructions
- Heat the olive oil in a dutch oven or large pot over medium heat. Once hot, add the onions and bell pepper. Cook until tender and browned on the edges, about 7-9 minutes, stirring occasionally.
- Add the ground beef and salt. Cook, until no longer pink, about another 6 minutes, breaking into small crumbles with a meat masher as you go.
- Add the garlic. Stir for about 30 seconds, until fragrant. Add the tomato paste, chili powder, black pepper, paprika, cumin and cinnamon. Combine well and cook for another 2 minutes.
- Add the broth and fire roasted tomatoes. Bring to a boil, then reduce heat to low, cover and simmer for 10 minutes (or longer if you want).
- Stir in the kidney beans, black beans and brown sugar. Taste and adjust seasonings as needed. Serve with your favorite chili toppings and enjoy!
Notes
- Storage: Store leftover chili in an airtight container in the fridge for up to a week.
- Freeze: Let chili cool completely then add to an airtight container or freezer-safe Ziploc bag and freeze for about 3-4 months. If freezing in a Ziploc bag, I recommend laying the freezer bags flat. Then, move it upright the next day once frozen to save space. When ready to enjoy, thaw in the refrigerator overnight and reheat the next day.
- Reheat: Add your desired portion to a saucepan over medium-heat and warm. You can also microwave portions in a covered microwave-safe container.
Nutrition Information
Nutrition is hand-calculated and accurate. No autocalulations! However, note that values can vary based on the brands you use and if you substitute ingredients.